
Envato Tuts+ Tutorials |
- 10 Best Live Chat Plugins for WordPress in 2021
- Creating Pretty Popup Messages Using SweetAlert2
- Build a Music App With an Android App Template
- Creating a Future-Proof Responsive Email Without Media Queries
- How to Create a Realistic Embroidery Text Effect in Adobe Photoshop
- 4 Important Personal Habits for a More Productive Life
- Best for 2021: Free Online Microsoft PowerPoint Templates (PPTs to Download)
- 42 Best InDesign Template Tutorials
- Creating a Figma Design System: Colors and Forms
- 42+ Best YouTube Thumbnail Ideas (Using a Custom YouTube Thumbnail Generator)
| 10 Best Live Chat Plugins for WordPress in 2021 Posted: 17 Dec 2020 11:18 AM PST Live chats plugins are the easiest, fastest and most efficient way to connect with your customers and resolve their problems without delay. There is no risk of missing your customers messages. You can support your customers anywhere, anytime, even on your phone. They, in addition, provide direct engagement with potential leads who would move on to the next website if there is no chat facility. In fact, WordPress live chat plugins offer the instant personalized experience that customers are looking for. Live chat cements trust and has the potential to help grow your business. Best-Selling Live Chat Plugins on CodeCanyonFor an affordable one time price, you can choose from and purchase premium live chat plugins for WordPress available on CodeCanyon and increase customer engagement, satisfaction and retention for your business.  Live chat plugins carry many benefits for your business and your customers. Some of these include:
At CodeCanyon you will find WordPress chat plugins that will vastly improve how you provide exccellent service to your customers. Best Live Chat Plugins for WordPress in 2021Talking directly with your customers has never been easier! Let's have a look at some of the best live chat plugins for 2021. 1. Live Chat Unlimited Using Live Chat Unlimited you can offer smarter and faster support to your customers directly from the website. And if you're away, there is a form to show you're offline. This multiple license version for installation on unlimited websites integrates smoothly with WPML and Polylang plugins for multi-lingual support. In addition to supporting more than one operator, all your visitors messages are encrypted. If you're looking for to install only on a single website then check out the single license version called Live Chat Complete. 2. Ninja Team Facebook Messenger for WordPress The Messenger live customer chat plugin allows you to integrate the Facebook Messenger experience directly into your website. Customers can interact with your business anytime with the same personalized, rich-media experience they get in Messenger. The messenger chat plugin automatically loads recent chat history between the customer and your business, so you can continue the conversation even after they have left your webpage. No need to capture their information to follow up, just use the same conversation in Messenger. 3. All in One Support Button and Callback Request All in One Support Button displays on every page of your site and provides as many contact methods as you want. You can choose which contact methods will be displayed on desktop and mobile versions of your site separately. That way you can set one link for desktop version and another for mobile. Among social communication channels supported include: Facebook Customer Chat, WhatsApp, Zendesk chat, VK chat, Skype, Slack, Viber, Telegram, Email and so many more. 4. WP Flat Visual Cha—Live Chat and Remote View for Wordpress If you are ready to see your support ratings soar, then consider WP Flat Visual Chat! With this plugin you can provide live support thanks to the unique 2-way remote desktop viewer build right into the live chat for WordPress. This way you can visually guide your clients to the right item by sharing a screen. You just need to select the element or item you wish to share, and engage in a visual two-way chat with your customers. It is also equipped with comprehensive chat settings built into the front-end so you can modify your text to suit your brand style and tone of voice easily, with no coding required. 5. Support Board—WordPress Chat Plugin How about automating your customers' communication using artificial intelligent-driven bots and chat system with platforms you use the most? Then Support Board is the right WordPress plugin for you. This richly designed, lightweight and fast, high-performance live chat plugin is ideal for businesses of all sizes. It has a clean and modern admin interface that allows you to manage all conversations from one place. It can integrate with Slack and Diagonal Flow to offer more customer engagement options. 6. Maxbot—Chatbot Builder WordPress Plugin You can create chatbots or intelligent virtual assistants in minutes without requiring any coding or technical knowledge. You simply need WordPress Chatbot Builder. It's simple to create different logic blocks and link them to respective triggers. You don't need to use any external API. It does not depend on any other services. It scales well and can handle hundreds of conversations at a time. This tool lets you build a human-like bot that engage clients and pique their curiosity to continue the conversation. 7. Facebook Chat—Facebook Messenger for WordPress You can turn visitors into shoppers and increase sales by integrating Facebook chat into your website. Visitors can easily contact you on this Facebook Messenger live chat plugin right from your website. You will be able to respond faster to their needs through this Facebook live chat plugin. This plugin comes with many customization options and premade layouts. You can set it to appear on specific pages or for a certain group of visitors, choose start-chat triggers, and even create your own welcome message. 8. WooWBot—ChatBot for WooCommerce Conversational commerce is the future of eCommerce. A live chat bot like WoowBot can help customers with product search, order status, support and more. It will connect with them on a personal level through natural interaction that mimics the everyday world. You can even use WoowBot shortcode to create single page shopping experience! You have the option to integrate WoowBot with Facebook Messenger, Whatsapp, Viber, Skype and more, just in case customers want to speak with a real human. 9. WordPress Whatsapp Chat WhatsApp Chat plugin is the fastest way for your website visitors to get in touch with you via their favorite messenger. You will stay connected anytime and from anywhere. Customizable and easy-to-use, the plugin offers a full range of styling settings and responsive layouts. You have diverse display positions, option to add your company logo, caption text, an inviting welcome message, and the ability to choose categories of visitors that will see the chat. 10. WhizzChat WhizzChat is a multipurpose chat plugin that is perfect for directory listing websites, social networking websites, active online communities and so on. It has all features required for communication in online communities where users chat with each other and share files, images, etc. It also has customer service live chat features that make it easy for users to communicate with the admin or support. These features include:
Free Live Chat Plugins for WordPressIf you're on a very tight budget or have no budget at all, free live chat plugins may be the way to go. Most of them have enough features to get you up and running, but as your business expands you will need to consider premium plugins. 1. EngageBay Live Chat With the EngageBay live chat plugin for WordPress, you can quickly and easily add live chat support to your WordPress website. It allows for instant communication with on-site visitors and customers and enables prompt resolution to their questions or concerns. 2. Tidio Live Chat Tidio Live Chat is a live chat service which allows you to communicate with your customers easily with the help of chatbots. After 1-minute installation, a Tidio Live Chat widget appears on your website and lets your customers get real-time personal help by answering questions and resolving their doubts. 3. Live Chat (Messenger API) and Polylang Integrate Messenger custom chat on your website for free. Modify colors, choose languages, integrate with PolyLang, change positions and much more… It's easy! 4. Smartsupp Live Chat Smartsupp live chat is one of the most popular live chat solutions in Europe, used by 283,000 websites. Start a personal conversation with your visitors, enage them using automatic messages, and turn them into happy customers. Measure your customer care quality with detailed statistics. Get a better understanding of customer behavior thanks to visitor recording. 5. Customerly—Free Live Chat Suite Talk with your visitors in real-time for free using Customerly. You can live chat with video chat and screen sharing. The conversation dashboard can easily handle live chat, Facebook Messenger chats and email. Mobile Apps to reply your live chat on-the-go Install a Live Chat Plugin for WordPress Now!As you can see, there's a wide range of live chat plugins available. At CodeCanyon you will find premium live chat plugins for WordPress that will help your website customer engagement ratings go through the roof.  Learn More About WordPress Live Chat PluginsHere are more articles to help you learn more about live chat plugins for WordPress and how to harness their power so your business can excel!  |
| Creating Pretty Popup Messages Using SweetAlert2 Posted: 17 Dec 2020 10:42 AM PST Every now and then, you will have to show an alert box to your users to let them know about an error or notification. The problem with the default alert boxes provided by browsers is that they are not very attractive. When you are creating a website with great color combinations and fancy animation to improve the browsing experience of your users, the unstyled alert boxes will seem out of place. In this tutorial, you will learn about a library called SweetAlert2 that allows us to create all kinds of alert messages which can be customized to match the look and feel of our own website. Display Simple Alert MessagesBefore you can show all those sweet alert messages to your users, you will have to install the library and include it in your project. If you are using npm or bower, you can install it by running the following commands: npm install sweetalert2 bower install sweetalert2 You can also get a CDN link for the latest version of the library and include it in your webpage using script tags: <script src="https://cdn.jsdelivr.net/npm/sweetalert2@10.10.1/dist/sweetalert2.all.min.js"></script> Besides the JavaScript file, you will also have to load a CSS file which is used to style all the alert boxes created by the library: <link rel='stylesheet' href='https://cdn.jsdelivr.net/npm/sweetalert2@10.10.1/dist/sweetalert2.min.css'> Once you have installed the library, creating a sweet alert is actually very easy. All you have to do is call the There are two ways to create a sweet alert using the Note that older versions of SweetAlert2, use a When a single argument is passed and it is a string, the sweet alert will only show a title and an OK button. Users will be able to click anywhere outside the alert or on the OK button in order to dismiss it. When two arguments are passed, the first one becomes the title and the second one becomes the text inside the alert. You can also show an icon in the alert box by passing a third argument. This can have any of the five predefined values: document.querySelector(".first").addEventListener('click', function(){ Swal.fire("Our First Alert"); }); document.querySelector(".second").addEventListener('click', function(){ Swal.fire("Our First Alert", "With some body text!"); }); document.querySelector(".third").addEventListener('click', function(){ Swal.fire("Our First Alert", "With some body text and success icon!", "success"); }); Configuration Options to Customize AlertsIf you simply want to show some basic information inside an alert box, the previous example will do just fine. However, the library can actually do a lot more than just simply show users some text inside an alert message. You can change every aspect of these alert messages to suit your own needs. We have already covered the title, the text, and the icons inside a sweet alert message. There is also an option to change the buttons inside it and control their behavior. By default, an alert will only have a single confirm button with text that says "OK". You can change the text inside the confirm button by setting the value of the Each of these buttons can be given a different background color using the If you interacted with the alert messages in the first example, you might have noticed that the modals can be closed by pressing either the Enter or Escape key. Similarly, you can also click anywhere outside the modal in order to dismiss it. This happens because the value of When you show two different buttons inside a modal, the confirm button is the one which is in focus by default. You can remove the focus from the confirm button by setting the value of The confirm button is always shown on the left side by default. You have the option to reverse the positions of the confirm and cancel buttons by setting the value of Besides changing the position and color of buttons inside the alert messages, you can also change the background and position of the alert message or the backdrop around it. Not only that, but the library also allows you to show your own custom icons or images in the alert messages. This can be helpful in a lot of situations. You can customize the backdrop of a sweet alert using the All the alert messages pop up at the center of the window by default. However, you can make them pop up from a different location using the You can disable the animation when a modal pops up by setting the value of the In the following example, I have used different combinations of all the properties discussed in this section to create four different alert messages. This should demonstrate how you can completely change the appearance and behavior of a modal created by the SweetAlert2 library. document.querySelector(".first").addEventListener("click", function() { Swal.fire({ title: "Show Two Buttons Inside the Alert", showCancelButton: true, confirmButtonText: "Confirm", confirmButtonColor: "#00ff99", cancelButtonColor: "#ff0099" }); }); document.querySelector(".second").addEventListener("click", function() { Swal.fire({ title: "Are you sure about deleting this file?", type: "info", showCancelButton: true, confirmButtonText: "Delete It", confirmButtonColor: "#ff0055", cancelButtonColor: "#999999", reverseButtons: true, focusConfirm: false, focusCancel: true }); }); document.querySelector(".third").addEventListener("click", function() { Swal.fire({ title: "Profile Picture", text: "Do you want to make the above image your profile picture?", imageUrl: "https://images3.imgbox.com/4f/e6/wOhuryw6_o.jpg", imageWidth: 550, imageHeight: 225, imageAlt: "Eagle Image", showCancelButton: true, confirmButtonText: "Yes", cancelButtonText: "No", confirmButtonColor: "#00ff55", cancelButtonColor: "#999999", reverseButtons: true, }); }); document.querySelector(".fourth").addEventListener("click", function() { Swal.fire({ title: "Alert Set on Timer", text: "This alert will disappear after 3 seconds.", position: "bottom", backdrop: "linear-gradient(yellow, orange)", background: "white", allowOutsideClick: false, allowEscapeKey: false, allowEnterKey: false, showConfirmButton: false, showCancelButton: false, timer: 3000 }); }); Creating Toasts with SweetAlert2You have probably seen small messages or alerts that appear on smartphones every now and then. These messages appear near the bottom of the screen over all other content and disappear after some time. They are useful when you want to inform users about something like completion of a download file etc. You can turn any alert into a toast notification by setting the value of Swal.fire({ toast: true, icon: 'success', title: 'Posted successfully', animation: false, position: 'bottom', showConfirmButton: false, timer: 3000, timerProgressBar: true, didOpen: (toast) => { toast.addEventListener('mouseenter', Swal.stopTimer) toast.addEventListener('mouseleave', Swal.resumeTimer) } }) A lot of alerts and toasts that you add to your website will probably use the same value of attributes for consistency. For example, lets say you want to create two separate toasts one for successful sign in and another for wrong password. You can use the Here is an example: var toastMixin = Swal.mixin({ toast: true, icon: 'success', title: 'General Title', animation: false, position: 'top-right', showConfirmButton: false, timer: 3000, timerProgressBar: true, didOpen: (toast) => { toast.addEventListener('mouseenter', Swal.stopTimer) toast.addEventListener('mouseleave', Swal.resumeTimer) } }); document.querySelector(".second").addEventListener('click', function(){ toastMixin.fire({ animation: true, title: 'Signed in Successfully' }); }); document.querySelector(".third").addEventListener('click', function(){ toastMixin.fire({ title: 'Wrong Password', icon: 'error' }); }); Storing the mixin in a variable allows us to call Important SweetAlert2 MethodsInitializing different sweet alert messages to show them to users is one thing, but sometimes you will also need access to methods which control the behavior of those alert messages after initialization. Fortunately, the SweetAlert2 library provides many methods that can be used to show or hide a modal as well as get its title, text, image, etc. You can check if a modal is visible or hidden using the If you happen to use the same set of properties for multiple alert messages during their initialization, you can simply create a new Sweet Alert instance with const Toast = Swal.mixin({ toast: true, position: 'top-end', showConfirmButton: false, }) //now we can use Toast just like the Swal class Toast.fire(...) Note that this functionality was provided by the You can get the title, content, and image of a modal using the There are a number of other methods which can be used to perform other tasks like programmatically clicking on the confirm or cancel buttons. Final ThoughtsThe SweetAlert2 library makes it very easy for developers to create custom alert messages to show to their users by simply setting the values of a few properties. This tutorial was aimed at covering the basics of this library so that you can create your own custom alert messages quickly. To prevent the post from getting too big, I have only covered the most commonly used methods and properties. If you want to read about all the other methods and properties which can be used to create advanced alert messages, you should go through the detailed documentation of the library.  |
| Build a Music App With an Android App Template Posted: 17 Dec 2020 10:15 AM PST 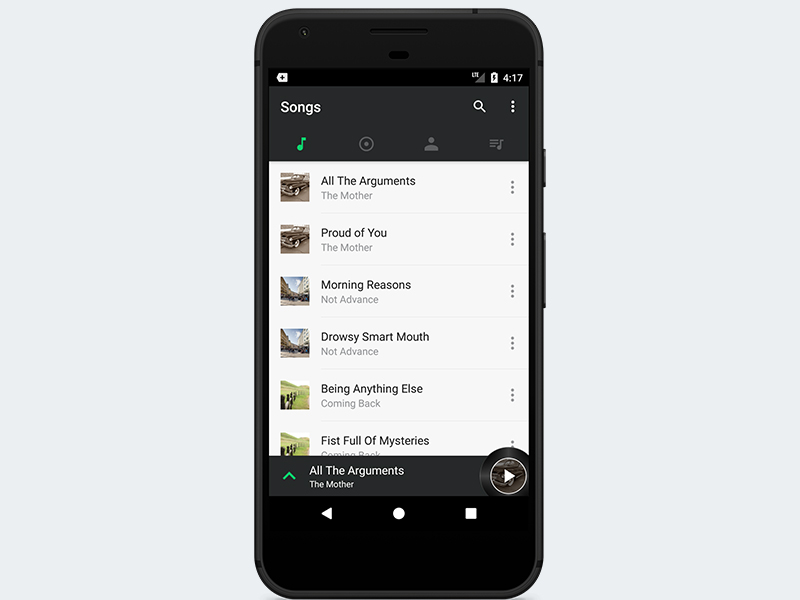 Developing a beautiful user interface for Android apps can be a time-consuming endeavour. Here are some of the steps we typically go through to design an app:
And this is only the tip of the iceberg—designing an app is a lot of work! All these tasks can be time-consuming—especially if you're the only one doing them. However, in this already highly competitive app market, you have to move fast and make sure your app has a beautiful user interface (in addition to making sure your code is bug-free) or else users will go and install your competitors' apps. Fortunately, CodeCanyon offers a wide range of beautiful application templates to kickstart your mobile app project. In this tutorial, I'll help you get started with one such template, called Android Material UI Template 3.0. We are going to build a material design music player for Android using this template and also explore some of its useful functionality. If music be the food of love, play on. — William Shakespeare PrerequisitesTo be able to follow this tutorial, you'll need Android Studio 3.0 or higher. 1. Get the TemplateTo begin building the music app, you'll need an account with Envato Market. So sign up if you haven't already, and purchase the Android Material UI Template 3.0 on CodeCanyon. You'll see how much work it saves you!  After you've successfully purchased the template, the template's source code is available in a ZIP file—so make sure you download that ZIP file to your computer. 2. Unzip the FileNow visit the folder where the ZIP file was downloaded and unzip or extract it.  When you enter the root folder and click on the Project folder, you'll see a list of template folders. Here is what I have on my Windows 10 machine after extracting it. Note that when you purchase this template, you have access not only to the Music App template but also to eight other templates (as you can see in the image above). 3. Import the TemplateFire up Android Studio 3 and select File > New > Import project... Make sure to navigate to the folder where the extracted template is located and select the Music App template to import. After a successful import, an Android Gradle plugin update dialog will pop up. It's recommended you click on the Update button—to allow Android Studio to upgrade our Gradle plugin to the latest version (  When Gradle has finished syncing your project automatically, you'll come across this error in Android Studio because we have successfully upgraded our Gradle dependency to  To resolve this, visit the project app's module build.gradle file and use  Inside the same build.gradle file, also do the following:
dependencies { compile fileTree(dir: 'libs', include: ['*.jar']) testCompile 'junit:junit:4.12' compile 'com.android.support:appcompat-v7:26.1.0' compile 'com.android.support:cardview-v7:26.1.0' compile 'com.android.support:recyclerview-v7:26.1.0' compile 'com.android.support:design:26.1.0' compile 'com.squareup.picasso:picasso:2.5.2' compile 'com.android.support:support-v4:26.1.0' compile 'com.balysv:material-ripple:1.0.2' } These Android artifacts are available at Google's Maven repository. So visit your project's build.gradle file to include it. allprojects { repositories { jcenter() google() } } By adding the artifacts, we have taught Gradle how to find the library. Make sure you remember to sync your project after adding them. Notice that this template uses the Picasso artifact to load and display the images. You can easily swap it for Glide instead if you want. Now, if you run the project, you'll get an error displayed on Android Studio Logcat.  To resolve this error, go to  You can see how well structured the project files are. You're advised to dive in and take a look at the source code (it's easily understandable). While there, you can freely modify any part of the code to suit your needs.  For example, if you don't like the colour choices used for the template, nothing is stopping you from visiting the colors.xml resource and modifying them to suit your taste.  4. Test the AppFinally, you can run the app!  You can tell that this music app interface is well designed. By default, the first tab is selected—it shows a list of songs available. Click on any of the songs and enjoy the music that's being played (though only one song is available in the app). Note that this template doesn't list the songs available on the host device. Instead, it comes with its own dummy data (for demonstration purposes). So you'll need to code the functionality for listing the songs on the host device. The dummy data class generator is located at  If you click the caret inside the current playing song container (located at the bottom of the screen), it will open up a nice-looking detail activity about the current song playing. Here we can easily implement more functionalities such as shuffle, repeat, and move to the next or previous song. Note that these functionalities aren't implemented by default in the template.
Observe that this beautiful template interface is an Android tabbed interface using  If you swipe right again, you'll see the list of artists displayed in the current tab.  Swiping to the last tab shows the playlists. Here, you can even add a new playlist by clicking the "+" toolbar menu.  Remember, if you want to make some money from this app by displaying ads, you can easily integrate it with AdMob. To learn about how to integrate AdMob with an Android app, check out my tutorial here on Envato Tuts+. More Amazing Music App Design Templates From CodeCanyonYou'll save a lot of time by creating with music app design templates. If you want to see other options you have, I've grabbed a some of the best music apps to create for music streaming on Android from CodeCanyon. 1. Android Music Player—Online MP3 (Songs) AppOf all the music app design templates found on CodeCanyon, this is the best seller. Users can stream songs as well as play music on their phones. Songs can be filtered by category through the app, Unlike an Android music player template that's free, the UI also includes dark mode. The Android Music Player template is one of the best choices for code beginners, experts, and everyone in between.  2. Your Radio AppThe name "Your Radio App" is fitting for this Android music template. Users can find and listen to the music that interests them thanks to unlimited categories. It also supports a sleep timer, favorites, sharing, and more personalized features. Try it out if you want a material design music player for Android.  3. Global: Radio, News, Podcast and BackendLooking for a fully-featured Android music app template? Try out Global. Not only does it do radio music streaming, but it can handle news and podcasts, too. You'll also find useful features, like:
Try out Global if you want a useful alternative to an Android music player template that's free.  4. Android Online RadioWith a more than 4.5 rating on CodeCanyon, Android Online Radio is one of the top music app design templates available. The UI is sleek and modern, and comes in dark mode. Take advantage of Google AdMob to monetize your work. If you've been wanting a material design music player for Android, you'll like this template.  5. Cherry—Android Online Music Player with Admin PanelCherry rounds out our list of music app design templates from CodeCanyon. This music Android app theme supports both on and offline listening. Users can run Cherry in the background while they use other apps. It even supports multiple languages, so you can reach a larger audience. Very few Android music player templates that are free can say that.  Learn to Code Android With Envato Tuts+ TutorialsLearning how to code is a useful skill, but it does take time to pick up. If you're ready to start learning, you'll want to check out the Envato Tuts+ YouTube channel. You'll find useful coding video courses and tutorials. There are even links to full Envato Tuts+ coding courses! You can get started with this free course on becoming a web developer: Written Android Tutorials From Envato Tuts+Head over to Envato Tuts+ for even more helpful Android and coding tutorials! Learn everything from converting WordPress websites into mobile apps using AJAX in PHP and jQuery, and a lot more. Here are a few tutorials to get you started:
Keep Coding, Keep Learning!App templates are a great way to jumpstart your next development project or to learn from other people's work. This article showed you how we quickly created a nice-looking music app using Android Material UI Template 3.0 on CodeCanyon. We also went through some of the best apps to create for music streaming on Android. Remember, if you're looking for inspiration or you're building an application and need help with a particular feature, then you may find your answer in some of these templates. Envato Market has hundreds of other Android app templates that you can choose from. There are templates for games and complete applications, as well as comprehensive starter templates like the one we used in this post. So take a look, and you just might save yourself a lot of work on your next Android app. If you want to explore more iOS apps and templates, then check out some of our other posts on CodeCanyon app templates!
This post has been updated with contributions from Nathan Umoh. Nathan is a staff writer for Envato Tuts+.  |
| Creating a Future-Proof Responsive Email Without Media Queries Posted: 17 Dec 2020 06:24 AM PST 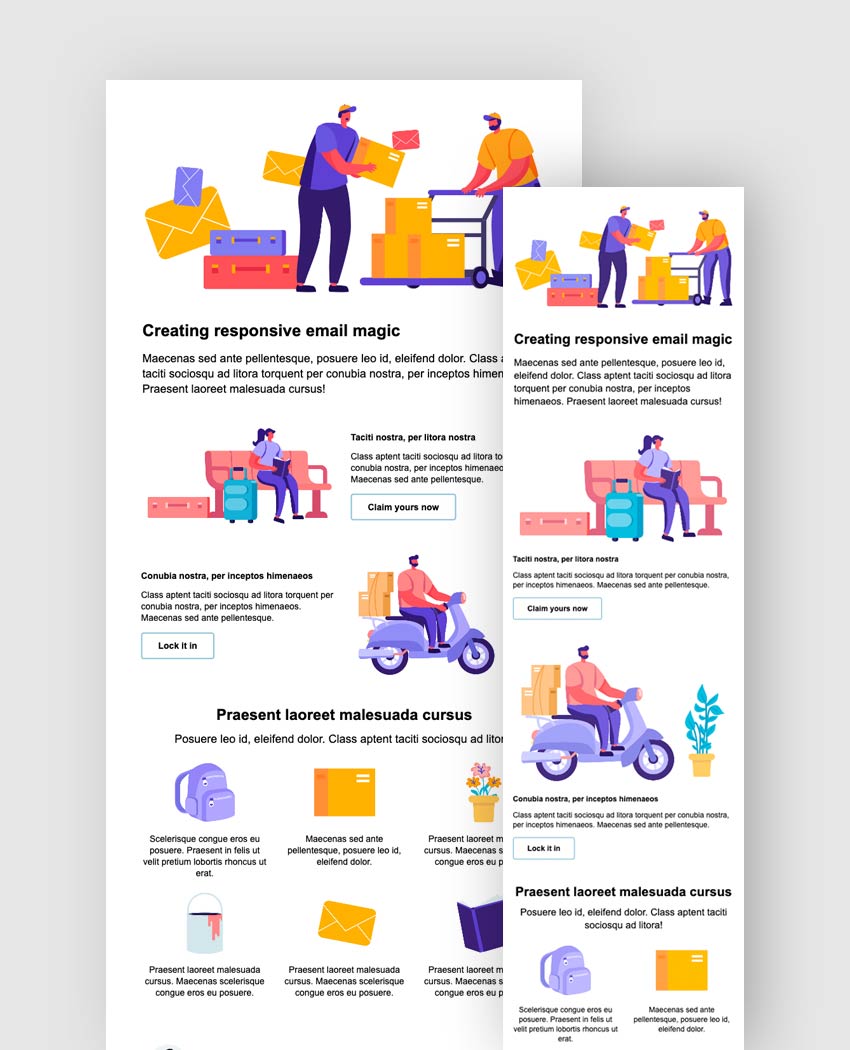 Using this method you can create an email that has responsiveness baked in to the layout, without any need for CSS or media queries in the Is Developing HTML Email Still Hard?HTML email has come a long way in the past ten years (yes, it used to even worse!) but there are still a surprising number of things that can go wrong when coding responsive emails for the inbox. These days, most email apps do a pretty good job of adhering to the latest HTML and CSS standards, but security or other restrictions sometimes mean that services will adjust or strip out key portions of your email's code, like the all-important But what if you could build an email template that was responsive, even in environments with no support for modern CSS like media queries, or scenarios where only the This tutorial is all about creating a great experience in email clients which have no nested CSS or media query support whatsoever, using the the fluid hybrid method of HTML email development. The fluid part refers to the fact that we use lots of percentages and elements that can move and expand to fit the space they are given. The hybrid part is because we also use All in all, it's a lightweight, fully responsive email without media queries that comes in at a tidy 17kb. Popular HTML Email Templates on Envato MarketIf you're looking for a ready-made, professional solution, grab one of our best-selling HTML email templates on Envato Market. We have hundreds of responsive options from as little as $5, with easy to customize features to get you started.  Not what you're looking for? No problem, this tutorial will teach you how to build your own. The Email Template We're Going to BuildHere's a demo on CodePen to show you the responsive HTML email we'll be building. Feel free to fork it and use it in your own projects! All the graphic elements in the template are part of the Flat People Characters collection by alexdndz available on Envato Elements. 5 Major Problems We're Aiming to Solve1. Gmail's app still doesn't support the |
| How to Create a Realistic Embroidery Text Effect in Adobe Photoshop Posted: 17 Dec 2020 06:00 AM PST 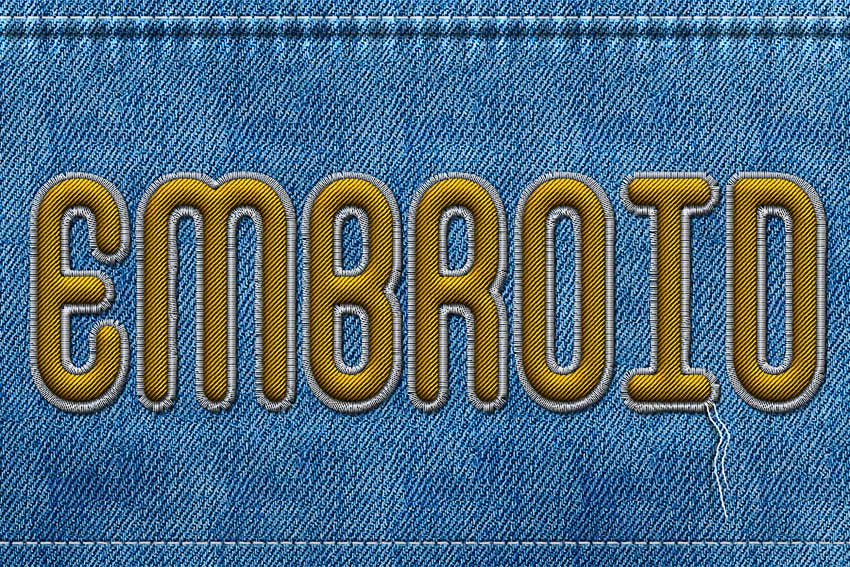 In this tutorial, you'll learn how to create a realistic embroidery effect in Photoshop using stitch brushes and layer styles. The end result will be a font that looks like embroidery! If you love the texture of embroidery, you'll enjoy this detailed tutorial. However, if you want to save yourself some time and still achieve a realistic embroidery texture, I've got great news for you.  You can download stitch effect Photoshop actions from Envato Elements. They're professionally designed and easy to use. You'll recreate the embroidery effect in a few clicks! Find our selection of top embroidery texture Photoshop actions after this tutorial. And if you'd like to watch a video on how to make an embroidery effect in Photoshop, follow along with us over on our Envato Tuts+ YouTube channel: What Will You Learn in This Adobe Photoshop Tutorial
Tutorial AssetsThe following assets were used during the production of this tutorial:
1. How to Create the Jeans BackgroundStep 1Create a new 1100 x 600 px document, and create a new layer called Jeans Background. Copy and Paste the Jeans Texture on this layer. Make sure you use the large texture (2000 x 1500 px).  Step 2Create a new layer called Textured and Fill it with white. Make sure you have the Foreground Color set to white and the Background Color set to black. Go to Filter > Render > Clouds.  Step 3Go to Filter > Brush Strokes > Crosshatch. Set the Stroke Length to 15, Sharpness to 16, and Strength to 2. You can, of course, change the settings to your liking.  Step 4Set the blend mode of the Textured layer to Soft Light and around 50% Opacity. If you want, you can change the color of the jeans; add a Color Overlay style to the Textured layer with blend mode Color and simply pick a color that you like.  2. How to Create Stitch BrushesStep 1In order to finish the jeans background and to start creating the stitched embroidery effect, we need some stitch brushes that we are going to make from scratch. Create a new PSD file, size 27 x 5 px. Fill the canvas with black. Go to Edit > Define Brush Preset. Set the brush name to "stitch" and click OK.  You can now close the new PSD file without saving and return to the initial PSD file (the one with the jeans background). Step 2Now we are going to modify the brush that we just made, to create a custom brush. Choose the Brush Tool and select the "stitch" brush from the Brush Preset Picker. Toggle the Brush Panel and make the following settings: Angle 90, Roundness 50%, Spacing 87%, and set the Angle Jitter to Direction.  Step 3Click on the top right corner of the Brush Panel and choose New Brush Preset. Name the new brush "stitch1".  Step 4Now we'll create the second brush. Again choose the Brush Tool and select the "stitch" brush from the Brush Preset Picker. Toggle the Brush Panel and make the following settings: Spacing 750% and set the Angle Jitter to Direction.  Step 5Click on the top right corner of the Brush Panel and choose New Brush Preset. Name the new brush "stitch2".  3. How to Add Sewing DetailsStep 1Use the Rectangle Tool and draw a shape as shown in the preview image. Make sure it exceeds the canvas on the top and left/right edges. Name this layer Jeans Border.  Step 2Go to Filter > Distort > Wave and set the Wavelength, Amplitude, and Scale to create a wavy border. Also go to Filter > Blur > Gaussian Blur and set the Radius to 0.7 pixels.  Step 3Add this layer style to the Jeans Border layer:
    Step 4Create a new layer and call it Stitch. Pick the Brush Tool and choose the "stitch2" brush. Set the size to around 13 px and the color to  Step 5Add this layer style to the Stitch layer:
    Step 6Go to Filter > Distort > Ripple and set the Amount 30% and Size Small. Your result should now look like this.  Step 7Create a new layer and call it Ripple Edge. Take the Brush Tool and pick the Soft Round Brush, which is a default Adobe Photoshop brush that you should have in your list. Toggle the Brush panel to customize the brush and make these settings: Size 50 px, Angle 90, Roundness 45%, Spacing 150%.  Step 8Draw two lines using this custom brush and color white. Set the blend mode of the Ripple Edge layer to Overlay, 40% Opacity. Also add a Drop Shadow layer style (color  4. How to Make an Embroidery Effect in PhotoshopStep 1Create a new text layer and call it Embroidered Text. Type your text using the False Positive font. Click on the Toggle the Character and Paragraph Panels button and set the Font Size to around 230 px, Vertically/Horizontally Scale, etc., as shown in the preview.  You can, of course, use any font type you want or even combine text and vector shapes. In this last case, you will have to convert the layers into a smart object. Step 2Add a Stroke layer style to the Embroidered Text layer. I am doing that to make the text a little thinner. Right-click on the layer and Convert to Smart Object.  Step 3Again, add this layer style to the Embroidered Text smart object:
     Step 4Convert the layer into a smart object one more time, so that you can add another layer style without rasterizing the effects. Press Control-T to transform the smart object and scale it to 130% on both the horizontal and vertical scales.  Step 5Duplicate the Embroidered Text smart object and call it Shadow. Move this layer below the Embroidered Text smart object. Step 6Now we'll add layer styles for each of these two layers. Let's start with the Embroidered Text smart object. Add an Inner Shadow (color     Step 7To make the effect more realistic, let's add a Filter > Distort > Ripple and a Filter > Distort > Noise effect. These two effects are added as Smart Filters, so you can edit them at any time by double-clicking on the Filter name.  Step 8Go to the Shadow Layer and set the Fill to 0%. Next, add a Bevel and Emboss (colors  Step 9Create a new layer just below the Shadow layer and name it Stitched Border. Keep the Control key pressed and click on the Embroidered Text layer thumbnail to make a selection. Go to Select > Modify > Expand and expand by 5 pixels.  Step 10Go to the Paths tab and choose Make Work Path.  Step 11Select the Brush Tool, color  Step 12Add a Drop Shadow (color  Step 13Finally, let's add a layer style to the Stitched Border smart object: Drop Shadow (color     Your Embroidery Texture in Photoshop Is Done!In this tutorial, you learned how to make an embroidery effect in Photoshop. As we promised, below you'll find some of the best embroidery texture Photoshop actions we've got. Save time and have all the fun with them!  5 Top Embroidery Effect Photoshop Actions From Envato ElementsNext up, I'll show you some of the best embroidery texture Photoshop actions from Envato Elements. If you're a graphic designer or an avid Photoshop expert, you'll love our subscription-based marketplace. For a low monthly fee, you get unlimited downloads of Photoshop add-ons, fonts, graphic templates, and more. The actions you're about to see are way better than any stitch effect Photoshop free download out there. 1. Embroidery Sticker - Photoshop Action (ATN, ABR, PAT, PSD)We begin with a really cool and fun add-on. This embroidery effect Photoshop action is designed to look like stitched stickers. Achieve a realistic patch effect on jeans in a few clicks. In this kit you'll get seven stitch layers and unlimited stitch colors. 2. Smart Embroidery - Photoshop Action (ATN, ABR, PSD) If you're looking for a very realistic embroidery texture, this is for you. This embroidery texture Photoshop action transforms any text or shape into realistic embroidery in one click. You'll get three different embroidery effects, and you can choose any color for the stitches. 3. Realistic Embroidery - Photoshop Actions (ABR, ATN, ASL) This embroidery effect Photoshop action is elegant and professionally designed. It's a very complete kit that includes:
4. Sewing & Embroidery Photoshop Kit (ABR, ASL, PAT) If you're searching for the most complete stitch effect Photoshop action kit, you've found it. Add this to your collection and you won't need anything else for embroidery textures. You'll get:
5. Felt Craft - Stitch Effect Photoshop Action (PSD, PAT, ASL, ABR) This stitch effect Photoshop action is great for holiday projects. Don't fall for a stitch effect Photoshop free download. Instead, get this complete set of felt crafts with everything you may need:
Explore More Cool Photoshop Tutorials and ResourcesYou've learned how to make an embroidery effect in Photoshop. You've checked our top embroidery texture Photoshop actions. Now, all that's left to do is to give you more awesome tutorials:
 |
| 4 Important Personal Habits for a More Productive Life Posted: 17 Dec 2020 05:55 AM PST Let's be real: productivity is difficult. You get motivated, you set goals, you put systems and routines in place... but reality doesn't seem to care. Another urgent crisis calls, the baby wakes up too early, you get sick, or drama at work erupts, again. Your plans crumble under the weight of one unavoidable interruption or one obligation after another.  You can't guarantee an interruption-free, emergency-free, drama-free existence, even for a few days or hours. You can't control the world; you can, however, control your part of the world. When you build strong, helpful, energizing and overall good personal habits into your life, you lay down obvious tracks to follow. The stuff of life will derail you, sometimes, but the tracks will be there. The more consistently you follow them, the easier they become. You don't even have to think about it. Build these important personal habits, one at a time, until they are integral to your life. The result will be you, but better, working at higher levels of efficiency, intelligence, creativity, and focus. 1. Value Your SleepLack of sleep, or poor quality of sleep, is a pretty big problem: sleep deficiency results in increased risk for obesity and disease, reduced immunity, moodiness, and impaired cognitive functioning. You're just not as good at thinking, concentrating, being creative, solving problems, or making decisions when you're tired. So why aren't we sleeping enough? Our ability to create artificial daylight, plus our tendency to get lost in screens and our weird cultural obsession with being busy enough, adds up to a devaluation of sleep. We have developed a caffeine-culture which awards points to the one who stayed up latest, got up earliest, and seems to be the busiest, most important, most sleep-deprived of the group. Frankly, that's just stupid. Not sleeping enough doesn't make you important; it makes you tired. The truth is that we do end up getting "enough" sleep, somehow. But it's often due to lack of routine, sleeping in past alarms, sleeping away weekends and days off, or crashing for a short nap that stretches into all afternoon. We end up missing out on the parts of life we want to be experience. The recommended eight hours of sleep per night is no magical number. The amount of sleep you need may be less, or more; you'll need to do some investigating to find out. First, start tracking your data: when you go to bed, when you wake up, your quality of sleep, and how tired or alert you feel during the day. Next, give yourself either a regular bedtime or a regular wake time. If you set a regular bedtime, let yourself sleep until you wake naturally. Or, if you set a regular wake time, let yourself go to bed when you start to feel tired. You may need "extra" sleep for a few days as your body catches up, but soon you should start to see a somewhat steady sleep amount. Once you've determined that amount, stick to it as best you can. Say no to things that keep you up past your ideal bedtime, turn the screens off, or, if you know you'll be up late at an event, give yourself a later wake time the next day. With adequate sleep, you won't be operating from exhaustion anymore. You'll process and analyze information better, you'll make better decisions, and you'll remember more. You'll get less frustrated by obstacles and feel less overwhelmed by big projects or complex tasks. Hypothetically, you'll even be less irritated by idiotic people, but I make no guarantees on that last one. 2. Exercise Every DayHere's what happens when you exercise, according to neuroscientist Judy Cameron, Ph.D: Immediately, the brain cells will start functioning at a higher level... making you feel more alert and awake during exercise and more focused afterward. When you work out regularly, the brain gets used to this frequent surge of blood and adapts by turning certain genes on or off. Many of these changes boost brain cell function and protect from diseases... You take in more oxygen when you exercise, and your hippocampus, the part of your brain that makes learning and memory possible, gets a boost from all that extra oxygen floating around. Regular exercise can actually increase the size of your hippocampus, over time, effectively reversing, or slowing, the effect of aging on your brain. Exercise makes your brain work better, in other words. It also gives you more endorphins, which make you feel happier and better about life in general. Pop quiz: Is it easier to tackle a big project, make a difficult phone call, or finish a complex task a) when you feel tired and down and sluggish or b) when you feel alert, focused, and optimistic? I know, I know: exercise takes time. Who has extra time? When you're busy, stressed, and behind, exercising regularly seems unappealing and impossible. The benefits are worth the effort; it's when you're busy, stressed, and overwhelmed that you need exercise the most. You don't have to join a gym or carve out an hour of time. Aim for 20 minutes a day, which will get you a recommended 2.5 hours of exercise each week. Making exercise a small daily habit can make it easier to stick with than doing a longer exercise session a few days a week. Daily means no excuses, no options, and no negotiating. It simplifies the process, by giving you less to resist or bargain with yourself about, so it becomes easier to just do it. Tai chi, walking, and strength training are among the top 7 exercises recommended by Harvard Health, but there are plenty of other options. The key is to make it simple, accessible, and easy to begin. 3. Establish a Power HourYou can call it something different. Planning time. Morning motivation. Evening ritual. Personal growth pursuit. Whatever. The important thing about this habit is not what you call it, but that you do it. Set a regular time. Daily is best, but biweekly or even weekly is acceptable. An hour is great, but not required; if thirty minutes is what you have, thirty minutes will do. This habit is difficult to teach, because precisely what you do is up to you. The goal is to spend this time improving yourself and managing your life. Meeting those goals can look very different from one person to the next. Here are a few of the things I do or have done in my power hour:
At first, don't worry about the agenda. Maybe write down some notes, or read a book or an article. Review your calendar. Think about a big goal and how you could work toward it. It's the practice of attention that is important as you establish the habit: you are training yourself to give proactive attention to your personal development and your life. Instead of waiting for the next crisis, you're thinking about your desires, your priorities, and the things you need to accomplish ahead of the need. Maybe at first, you will always feel behind the need; that's normal. It will get better.  When you establish this daily time in your life, you will start to feel more in control of your life. That feeling of control will not be absolute; doubt creeps in, your task list is still too long, the stress comes back. But every day that you accomplish this small but powerful routine, you will sense the control grow and the stress diminish. You will see that you are able to change things. You will gain perspective. You are on your way to creating and governing your own life, rather than responding to various events and circumstances, running frantically and never catching up. You'll start seeing things before they happen. You'll be taken by surprise less: fewer instances of "Oh, I totally forgot about the seminar today!" and more instances of "That seminar is tomorrow, I'd better get ready." Those are small victories, sure; but they add up to a life that's less stressful, less chaotic, more certain and confident. The internal confidence you build by spending time on yourself and life management is huge. You'll start to get to know yourself. You'll start to peel through the layers of obligation and need and begin to discover your own desires and abilities again. And you'll start to see how to reclaim your time, how to manage your life, how to pursue your goals, how to reach your potential. There's one caution with this habit, and that's to avoid the trap of overconsumption. It's easy to get addicted to the input portion of this hour, the part where you're reading or researching, doodling or sketching out plans or taking a course. Those inputs are good, but without a corresponding output, they create internal stagnation. If you've been doing some kind of power hour for a while, but you feel stuck and unmotivated, this might be your problem. All inflow, no outflow. Stagnation creates self-doubt, which turns into paralysis. After your habit is well-established, then, examine your input-output balance. Do some reading, researching, planning, and learning, then do some practicing, publishing, doing, sharing. Start producing what you're learning, even in the most rudimentary way. As you match output with input, you create flow in your internal life. Each small bit of progress creates more momentum, leads to more progress, and ramps your productivity (and happiness) up another level. 4. Give Your Brain DowntimeThis habit translates into one really basic action: put your screen(s) away. Your brain needs downtime, time when it's not busy receiving and processing a million bits of information per minute. Attention and memory are "our brain's two most precious resources," says neurologist Richard Cytowic. When we squander them on barely conscious social browsing, game playing, and phone tapping, we suffer needlessly. Lack of stimulus-free time leads to depleted neural resources, decision fatigue, and reduced energy, while regular downtime helps your brain create connections and solve problems, improves your concentration, and, ultimately, raises your productivity. There are many ways to help yourself do less screen-staring; probably the worst way is to mentally determine to "check my phone less" and then depend on willpower to make it so. Good luck, Chuck; it's not gonna happen. The phone habit is ingrained, deep and wide, and a private decision plus a waning supply of willpower is not going to break it. Fortunately, there are better ways.
Digital devices and screens are great, helpful tools. Too much is just too much. When you don't have downtime, you're just more likely to be anxious, distracted, and unable to let your brain rest or develop any kind of high-level perspective on your life. Television can be a big distraction, too, and can negatively affect your sleep; set the same 1-2 hour pre-bed limitation, and unwind with a book, puzzle, art, conversation, journaling, or other hobby before bed. Finally, you'll have to learn, once again, how to be bored. It's okay to stand in line without a phone in your hand. It's actually not bad for you to sit quietly on a bench, or take a walk, or have a conversation, or stare out the window, without devisus interruptus on the scene. Rediscover the things you like to do, whatever they are, and give yourself guilt-free, undistracted time to do them. Your brain will be busy in the background, doing its thing, while you do yours. Consistent Habits for Consistent ProductivityThese four habits are going to be difficult to establish for most of us. It's probably best to choose one at a time and do it consistently for a month or two. Then add the next. So much of your productivity success comes straight from your internal workings, your attitude, and your physical health and energy. Organization, systems, and productivity tools are great, of course; but being energized, focused, and positive is even better. Start there, and you'll be able to use your productivity learning, your systems, and your tools even better. ResourcesGraphic Credit: Health icon designed by Evan MacDonald from the Noun Project. Editorial Note: This content was originally published in November of 2015. We're sharing it again because our editors have determined that this information is still accurate and relevant.  |
| Best for 2021: Free Online Microsoft PowerPoint Templates (PPTs to Download) Posted: 17 Dec 2020 04:55 AM PST Are you searching for "free online PowerPoint templates?" This tutorial has you covered. Those free options might suffice when costs are your primary focus. But, you owe it to yourself to check out all the online PowerPoint templates in this tutorial. A bit of cost goes a long way when you're building a presentation.  The templates that you'll see in this article are all perfect to use with PowerPoint Online. We're going to show you free options, as well as a source for unlimited PowerPoint online themes. Finally, you'll see single download options for top Microsoft online PPT templates. The Best Source for Unlimited Online PowerPoint Templates in 2021So, you're ready to build your presentation. You want a sense of professionalism, but you might go searching for free PowerPoint online templates first. If this is your first search, you might be disappointed by the results. To keep costs low, you can use Microsoft PowerPoint online. It's a browser-based version that you can use for free. And because you've freed up your funds for other purposes, you can now afford a professional online PowerPoint template. That's where Envato Elements comes into play. One subscription gives you more than 20,000 premium online PPT templates that are ready for your content. It's the best way to save time and create an excellent presentation.  Don't miss out on how many other resources that Envato Elements includes. Your subscription unlocks unlimited stock photos, graphics, and more. Those round out your presentation perfectly. The online PowerPoint templates you'll see throughout this article work great with PowerPoint Online. To learn more about PowerPoint online, check out our guide below: Later in this tutorial, you'll see another option for top Microsoft online PPT templates. GraphicRiver is a pay-as-you-go marketplace to source more Microsoft online PPT templates. Top 5 Premium PowerPoint Online Themes on Envato Elements for 2021These premium online PowerPoint templates are one of the best ways to build a pro presentation. Elements has an incredibly deep library, and we're here to be your guide. Here are five of our favorites that you can use for your next presentation in 2021: 1. The X Note - PowerPoint Template Free online PowerPoint templates have basic slides to build presentations. But for the best results, turn to a premium online theme for PowerPoint like The X Note. One of the most powerful slide decks available today, it instantly elevates all your content. Over 40 unique custom slides are included. Plus, you'll find icons, device mockups, and much more. 2. Agio : PowerPoint Presentation Agio takes the hard work out of building presentations by giving you all the variety imaginable in a single pack. More than 600 stylish slides are included! Pair these with your content, and you'll quickly have a slide deck to be proud of. Nine color options are included to change up your visuals. 3. STYLE - Multipurpose PowerPoint Template V50 Style: it's in the name. This beautiful set of slides delivers it in an online theme for PowerPoint. Explore features like:
Then simply drop in your fantastic content, and you'll be all set. There are few free online templates for PPT as good as Style. 4. Native Minimalist PowerPoint Template Less can be more in a presentation. As you think about how to download PowerPoint templates online, it's vital to think of your purpose. If you want slides that accent your message without distraction, this premium Elements template is right for you. Packed with dozens of slide designs, you're sure to find options that work perfectly for your next project. 5. Sprint PowerPoint Template Microsoft online PPT templates are meant to help you jumpstart creativity. Sprint PowerPoint Template styles any material with a bright and fresh new look. That makes it a quick and versatile option for all your needs. The slides are built in the classic 4:3 layout, ideal for printing and sharing. If you want a premium alternative to free online templates for PPT, give Sprint a shot. The Best Source for Pay-As-You-Go Premium Online PowerPoint TemplatesYou've already seen Envato Elements, the incredible all-you-can-download creative library that many pros are using to create professional projects. If you want another marketplace option, we've got another suggestion for you. GraphicRiver offers single purchase PowerPoint online themes that keep your costs low. You'll pay only for what you choose to download, and premium templates are highly affordable.  Here are five of our favorite premium Microsoft PowerPoint online themes on GraphicRiver available in 2021: 1. Massive X Presentation Template v.4.8 Fully Animated When purchasing an individual set of online PowerPoint templates, it truly pays to find the most value. The best way to do that is with sheer variety. It's precisely what Massive X offers: more than 600 slides, almost 1,000 icons, infographics, photos, and more. It's a flexible template that's one of the best online themes for PPT. 2. Imaginary - Portfolio & Photography PowerPoint Template PPT presentations free creatives to share their work on a broad stage. For photographers and designers, they're a winning way to share portfolios. The Imaginary theme is designed expressly for this purpose, with lush image placeholders throughout and plenty of space for descriptive text. Instead of free online templates for PPT, use Imaginary. 3. Motagua - Multipurpose PowerPoint Template Motagua is one of the most robust premium online themes for PPT available today. Inside the pack, you'll find:
Each slide of this online theme for PowerPoint makes your life simple by being customizable in just a few clicks. 4. ThePress - Animated PowerPoint Template By choosing an animated PPT theme like this one, you can effortlessly incorporate studio-quality transitions into your next presentation. Rather than spending precious time adding them yourself, these are ready to roll the moment your download finishes. ThePress also includes over 400 slides to present any type of content. Not many free online templates for PPT can say they've got that. 5. Simple & Modern Business PowerPoint Template Companies big and small will benefit from a professionally designed slide deck. Ideally suited for sharing data and concepts, this minimalist template is a top choice for business. Custom infographics and icons drive big ideas, and the text is clear and easy to read. In all, 500 slides are included across seven online themes for PPT. 20 Free Online PowerPoint TemplatesBefore looking for free online PowerPoint templates on the web, check Envato's free offerings first. You know that premium templates generally have more to offer, so try out various premium template files (not always PowerPoint templates) at no cost to you. Here's the deal:
Free online PowerPoint templates are helpful if you lack the budget for a pro option. We've spent time searching for free PowerPoint online templates. Here are 20 options that you can use. 1. Hexagon Presentation Dark Searching for simple PowerPoint templates for free online to quickly put a presentation together? This layout includes several basic slide designs. Ample space is included for photos and video. 2. Travel PresentationTravel Presentation uses an image friendly design to style your content. Add in your travel photos to customize this free PPT template. 3. Cutelor Free Education PowerPoint Template PowerPoint templates for free online often don't have specific themes, but this one is custom-made for education. The graphics have a hand-drawn look, with pastel colors. Fourteen slides are included. 4. Noor PowerPoint TemplateNoor is a multipurpose free online PPT that you can adapt to most presentation topics. There are over 100 slides, all in the 16:9 widescreen layout common to many modern projectors. 5. Gilano Free Business PresentationA free business PPT, Gilano can be used as a product intro or general overview slide deck. Be sure to use PowerPoint's built-in features to customize slide layouts, fonts, animations, and more. 6. Outdoors Presentation Outdoor imagery is often used to convey a sense of space and possibility. This simple PPT theme uses this aesthetic, paired with a set of default slide layouts. Remember to use the app to adjust key details. Use it if you've been looking for free online templates for PPT. 7. Snowscape PresentationFeaturing winter graphics, this free PPT template delivers a clear seasonal focus. Creative control is left up to you, with an assortment of slide designs available within. 8. Free Annual Report PowerPoint TemplateThese free Microsoft PowerPoint online themes include slides expressly designed to accomplish this yearly goal. Sixteen layout designs are included, each with editable graphics. Try it if you want a free PowerPoint template for 2021. 9. City Free Presentation Template The 23 slides of this free PPT template share a light blue backdrop and urban-inspired graphics. On them, you'll find a collection of content placeholders, text boxes, infographics, maps, and more. 10. Portfolio PowerPoint TemplateHaving a portfolio slide deck is imperative for creatives trying to share their work with the world. A free PowerPoint template like this provides the essential framework needed to that. The clear focus is on photography, with room for captions too. 11. Free Abstract PPT TemplateThis abstract free PPT template presents content on a dark blue backdrop. Building a presentation with it simply involves adding your slides, then filling them with your unique content. 12. Free BAZZ Animated Presentation Templates PowerPoint templates for free online like BAZZ are worth looking at. It's got built-in animation introduce motion to static slide decks. BAZZ includes an array of animated layouts, such as device mockups and timelines. Animation timings can be adjusted within PowerPoint's menu. 13. Tikala Free Presentation TemplateHere, content is presented atop an abstract cityscape backdrop. Over twenty slides are included, some with simple charts and infographics to illustrate data. 14. Free Design PPT TemplateOnline PowerPoint templates can adapt to the needs of most projects. A design like this provides the foundation needed to create your slides, thanks to PowerPoint's suite of editing features. 15. Circle Presentation Template Circles are the primary theme used throughout the aptly titled Circle Presentation Template. The 80 slides are fully editable and come in a wide variety of layouts. Mix and match to choose the ones you need. 16. Free Simple PowerPoint TemplateWith a dozen layouts, this free theme is meant to convey a lot of information on each slide. If you need added flexibility, PowerPoint's default layouts can be added with just a couple of clicks. Not a bad pick if you've been looking for PowerPoint templates for free online. 17. Free Fancy PowerPoint TemplateThis no-frills free PPT template deck helps you quickly build visual aids. The layout is meant for project tracking and broad overviews. With your creativity, it can adapt to a broader scope. 18. Pattern PowerPoint Template Using the minimalist style, the Pattern PowerPoint template delivers abstract visuals. Vector graphics are utilized on every slide of this free PPT template. Key details of the design can be customized to match your branding. 19. Exclusive Free PowerPoint TemplateTwenty-five slides of assorted themes combine to form this set PowerPoint templates for free online. In the pack, you'll find a table of contents, text columns, a team intro slide, and more. 20. Photo Montage PresentationOne way to use PowerPoint is to build photo slideshows. And it's the express purpose of this free PPT theme. Drag-and-drop placeholders streamline the process of importing images onto the slides. How to Search Envato Elements Online & Download Premium PowerPoint Templates FastYou've seen the power of using PowerPoint online templates, particularly with the help of Envato Elements. Let's learn how to navigate the library and find premium templates that are right for you: 1. Browse to PresentationsStart on the Envato Elements home page. It's always worth looking at all the featured and recent files shared on the site. New files are added continuously to help you stay creative. Hover over the Browse button, then choose Presentation Templates to start browsing for templates.  2. Filter to PowerPoint |
| 42 Best InDesign Template Tutorials Posted: 17 Dec 2020 02:15 AM PST Whether you are a skilled designer or just starting out, Adobe InDesign templates are a great resource to have in your toolbox. Design templates have to be properly set up to let you or your clients update them easily. To help you get inspired, we've gathered a collection of 42 InDesign template tutorials, ranging from brochure templates to something with more pages like InDesign book templates. These Adobe InDesign template tutorials are great for any experience level, so you can also create awesome flyers, brochures, newsletters, magazines, and much more! Let's dive in! In a hurry? We've got over 2,000 high-quality Adobe InDesign templates over at Envato Elements and GraphicRiver. Go check them out!  Looking for some freebies? Check out the Envato Elements Freebies section for free monthly assets. You might score some free InDesign resume templates, newsletter templates, or other items that might help your projects. If you're new to Adobe InDesign, head on over to our Envato Tuts+ YouTube channel and check out our amazing, full length video course on InDesign for Beginners. This is one of our most popular courses and you'll see why when you jump in. But if video isn't your thing, check out our The Beginner's Quick-Start Guide to InDesign (Tutorials, Tips & Resources). How to Make a Club Flyer Template in InDesignLearn how to create an InDesign flyer template for a night club or party. This tutorial also includes directions on how to create neon signs that will make your flyer look glamorous and atmospheric.  How to Create a Handout TemplateCreate an informational InDesign flyer template that's easy to adapt to your own brand guidelines. This professional-looking InDesign template has all the basic elements you or your client might need to get a new business flyer started and distribute it by mail in your next marketing campaign.  How to Create an Event Flyer Template in InDesignAdaptable for any event, this versatile InDesign flyer template will attract crowds. In this tutorial, you'll learn some important basic techniques when creating an InDesign template like setting up typography and working with gradient swatches and layers. Customise it with your own colors and content, and you are ready to get the party started!  How to Make a Fundraiser Flyer TemplateGive back to the community with this fundraiser Adobe InDesign template tutorial. It's easy to follow and full of basic techniques that you need to learn if you are starting out in design. This tutorial shows you how to make a ready-to-print InDesign flyer template.  How to Create a Simple Magazine Template in Adobe InDesignIf you're looking to get into publishing, this tutorial is perfect for you! This InDesign magazine template tutorial shows you how to make your own creative magazine design. Whether you are a beginner or intermediate designer, this tutorial will leave you with an InDesign template that you can come back to again and again.  How to Make a Brochure Cover Design in Adobe InDesignLearn how to make a brochure cover template that's eye-catching and attractive. The cover of a brochure needs to be appealing for customers to grab it. In this tutorial, you'll learn essential tools to create a vector-based cover. This cover brochure template is perfect for your next promotional InDesign catalog template.  How to Make a Magazine: From a Creative InDesign TemplateIn this tutorial, learn the process of how to make a magazine from an existing Adobe InDesign template and create something that fits your own theme and style. This is handy if you are using one of our Envato Elements InDesign magazine templates and want to learn how to edit it!  How to Create a Book Template in InDesignSet up an InDesign book template to save some time in your next project. Learn how to make a book layout template in InDesign, including the cover, spine, and inside pages. Easy to follow, this tutorial is useful for any of your future projects (and yes, any book size too!). Psst! Use this as your own InDesign portfolio template and show your masterpieces!  How to Create a ResumeStart the year by applying for that dream job you've been wanting. In this tutorial, you'll learn how to create an awesome InDesign template. Learn about some basic typography elements and give your resume a refresh. You can easily use this project as an InDesign resume template by changing the image and updating the copy.  How to Customise a Business Card Template in Adobe InDesignIn this quick tip tutorial, learn how to edit an InDesign business card template from GraphicRiver and add your own spin to it. This tutorial is easy to follow if you are a beginner and want to spruce up an InDesign template design.  How to Make a Brochure From an InDesign TemplateWith the latest Adobe CC update, you have access to many ready-made InDesign templates that you can customise. In this tutorial, you'll learn how to edit an InDesign brochure template. Place some images, add copy, and your file is ready for printing.  How to Make a Portfolio Brochure Template in InDesignIf you are in any creative field, having a portfolio design template ready to go is a must. You need to present your work beautifully and in a way that it will stand out from the crowd. In this tutorial, you'll learn the basics of creating a stylish InDesign portfolio template so you can add your content and voilà!  How to Design a Creative ResumeWhether you are in the design field or not, having a presentable resume is necessary to make a great impression. In this tutorial, you will learn how to make a creative InDesign resume template. This one is full of tips and tricks, so you will be able to create your own unique template.  How to Create a Millennial Pink Stationery Set in Adobe InDesignIs millennial pink your thing? If it is, we are embracing it! If it's not for you (psst! here's the new Pantone color of the year 2019), you can turn this into a template that's easily customisable. Learn to put together an awesome stationery set consisting of letterhead, business card, and envelope. This is great if you want to get into branding and need a template in your back pocket.  How to Create a Brand Guidelines Document in Adobe InDesignLet's say you've just finished a branding project and you want to show your client and the rest of their company the correct way to apply the brand on everything from small-scale elements like stationery to brochures and advertising. In this tutorial, you will learn how to develop and create a brand guidelines document that will also serve as an InDesign report or presentation template. Say 'yay' for multi-purpose templates!  How to Create a Tasty, Trendy Menu Card in Adobe InDesignLearn how to create an InDesign menu template that will take your customers experience to another level. This tutorial is completely based on strong typographical elements and a summer-friendly color palette. Save this as a template that you will go back to over and over again.  How to Design a Stylish Kids' Magazine in Adobe InDesignIf you want to get started creating your own InDesign magazine templates for kids, this tutorial will take you through the steps of developing your own publication style. Learn to set up master pages and create striking InDesign page layouts that are aimed at kids. You will pick up some tips and tricks on how to format typographical elements that are kid-friendly.  How to Design a Stylish Real Estate Flyer in Adobe InDesignSuitable for beginners, this tutorial is a great way to enter the world of design. Create an InDesign flyer from scratch and learn how to make it print-ready. Versatile and minimal, this flyer tutorial will teach you some key techniques and skills to set up an Adobe InDesign template.  Packaging Design for Beginners: How to Create a Simple BoxIf you are a beginner and have yet to try your hand at two software packages for a single project, then this is the tutorial for you. Create an Illustrator and InDesign packaging template for a rectangular box. This is a great starter tutorial if you are looking to get into packaging design and want key tips. Take advantage of this tutorial and save it as an InDesign template for future projects.  Get Yourself Noticed! Create a Simple Business Card in InDesignWe are living in a digital era, but business cards will always be in. In this tutorial, you will start out by creating an InDesign business card template and learn about the golden rules to create a high-impact self-promotional tool. Learn about the essentials when creating striking business cards by creating not one, not two, but three examples from a single InDesign template.  How to Create a Rococo Style Wedding Invite in Adobe InDesignThe wedding invitation business is one of the most fun to get into—you can create loads of creative content. In this tutorial, create a Rococo-style wedding invite that can also be used as an InDesign wedding invite template. Learn how to format typography and choose if you'd like to add metallic foil to create a luxurious design. You will also learn how to set up your file for foil stamping—bonus!  How to Create a Fall-Themed Wedding Invite in Adobe InDesignIf you are looking a quick and simple fall-themed InDesign wedding invite template, this is a perfect all-around tutorial to get you started. Print design can be confusing, so this is a great introduction to prepare a file for metallic foiling.  How to Create an Invite for a Winter Wedding in Adobe InDesignLooking for a more rustic wedding invite? This InDesign template tutorial is easy to follow and covers the basic elements you need to set up a template. Whether you are designing this for someone else or for yourself, this template is a perfect fit for a winter wedding.  How to Create a Winter Sale Flyer in Adobe InDesignGet those sales going with this sweet marketing promotion. This winter InDesign flyer template style is collage-inspired and uses a hand-drawn font. Learn how to set up a flyer, create a snowy scene, and export your design for printing, all in just one program. This is a great intro tutorial if you are looking to get into the InDesign template business.  How to Create a CVCreate a timeless InDesign resume template that's easy to adapt to any job application you might have. This tutorial is strong in typography and InDesign page layout. By the end of it, you will be mastering both and creating your own InDesign templates!  How to Create a Typographic Valentine's Card in Adobe InDesignPolish your print design skills with this quirky letterpress-inspired card. You can adapt this technique to any message on any greeting card (more InDesign templates!)—it will be super easy! You will also learn how to format typography to a high standard and how to prepare your artwork for professional printing.  How to Create a 90s Style Event Flyer in Adobe InDesignIf you are looking for a specific style of InDesign flyer template, this is perfect for you. The nineties are making a comeback in fashion and design, so this flyer is great for advertising night clubs and music events. If you dabble in InDesign and Photoshop, this tutorial will help you advance in your skills by mixing both programs.  How to Create a Modern Retro Magazine Layout in Adobe InDesignVintage has been 'in' for a while, and there are no signs of it leaving. In this tutorial, you can learn how to add a contemporary feel to your vintage-inspired InDesign page layout. You'll design a few spreads for a fashion magazine while getting introduced to essential print design techniques. Keep this layout as an InDesign magazine layout template for future use!  How to Create an 'Everything Will Be Alright' Neon Poster in Adobe InDesignLearn how to create a neon effect in this poster tutorial that can double as an InDesign poster template. This is a great beginner tutorial that will teach you the essentials of InDesign and how to create an awesome looking effect. Adjust your design by adding your own copy and switching up the colors!  How to Create a Suffragette-Inspired Poster in Adobe InDesign #100YearsIf you are looking for a specific style of poster, this punk-inspired poster will rock your socks off! If you dabble in Adobe Photoshop and InDesign, creating this InDesign poster will be a breeze. Make it a unique InDesign template by adding your own spin to it!  How to Create an Alice in Wonderland Inspired Afternoon Tea Invite in Adobe InDesignLearn how to create a die-line cut on an invitation with this invite inspired by Alice in Wonderland. This essential trick will help you develop your own invitation in any shape you'd like. In this tutorial, you will also learn how to prepare your file for printing and create cool shapes. Apply this trick in your future InDesign templates to add something special to them.  How to Create an Ice-Cream Script Poster in Adobe InDesignThis summer-style pastel poster just makes you want to eat ice cream all day, every day! This super simple tutorial will walk you through some new techniques for creating print layouts in InDesign and any vector-based software of your choice. Once you've learned all the tips and tricks, you can go on to design your own poster and create your own InDesign template to reuse all summer long!  How to Create a Memphis Style Club Poster in Adobe InDesignLearn how to create an eye-catching poster in this InDesign tutorial. While it's not exactly an Adobe InDesign template tutorial, you will learn about the basics of designing a poster. Use the techniques you learn in this tutorial to create your own InDesign poster template for a music gig, event or night club.  How to Create a Tropical Stationery Set in Adobe InDesignIf you are a brand designer, having InDesign stationery templates on hand is key. In this tropical and botanical-inspired tutorial, learn how to lay out a business card and letterhead, all ready for printing. Turn this project into an InDesign template by changing up the images and your own copy, easy peasy!  How to Make a Trifold Brochure Pamphlet TemplateCreating a brochure in InDesign shouldn't be a difficult task. If you want to spice up your marketing pieces, learn how to make a brochure in InDesign. In this tutorial, you will learn the basics of how to set up an InDesign brochure template. A trifold brochure can be tricky to figure out, so we created an InDesign template tutorial that's easy to follow and understand. Give it a try!  Design Striking Layouts for Your Own Cookery Book Using InDesignIf you are starting out and looking at self-publishing, either in print or as an InDesign eBook template, this tutorial is great for beginners. Learn how to create a variety of InDesign page layouts and fundamental tools that will serve you well in the future. You can keep these InDesign page layouts as your own InDesign cookbook template for future use and add your own spin.  How to Create a Pastel Neon Club Flyer in Adobe InDesignMaster your gradient skills in this pastel-neon gradient inspired tutorial suitable for beginners. Learn how to create gradient swatches and apply it to this versatile layout that can be easily printed or distributed online. Let the typographic elements and colors shine in this flyer and create your own version to use as an InDesign flyer template.  How to Make a Medical Brochure Template in InDesignLearn how to make a brochure in InDesign and create your own template from it. Easy to edit, clean, and engaging, this brochure will communicate a message clearly. Creating a brochure in InDesign shouldn't be a difficult task, and this InDesign template tutorial is super easy to follow!  How to Make a Travel Brochure Template in InDesignCreate this versatile and stylish travel brochure template, a perfect promotional tool for travel agents. Turn it into a travel guide or a vacation catalogue template to show your clients the best you've got to offer. Adapt this template to your own colors, images and fonts to add your own spin!  How to Create a Summer Club Flyer in Adobe InDesignPromote your next night-club event with this quick and easy club flyer tutorial. Mix InDesign and Photoshop and create a stylish InDesign flyer that can be easily turned into a template. Master some basic tools and learn how to work with images in two software packages. Ready to get the party started?  How to Create a Rolling Stone-Inspired Magazine CoverLearn how to create this iconic music magazine cover in Adobe InDesign. The script-style logo and the stand-out palette have become synonymous with the magazine. Pay tribute to this classic magazine by converting this tutorial into an Adobe InDesign template. It never goes out of style, so you'll keep coming back to it!  How to Create an Easter Egg Flyer in Adobe InDesignInspired by mid-century style, create this cheerful Easter weekend flyer design. Turn it into an Adobe InDesign template and adapt it by using different fonts and colors. Master key tools from Adobe InDesign and Adobe Illustrator and create this spring-themed Adobe InDesign flyer template.  Ready to Get Started on Your Own Templates?I hope this list of Adobe InDesign templates tutorials inspires you to start your own! Templates are great time-savers for you and your clients. Setting them up properly and with a versatile design can really go a long way. If you are new to InDesign and need catalogue templates or report templates right away, head over to Envato Elements and GraphicRiver. We've got many options to explore! If you liked this article, you might like these:
 |
| Creating a Figma Design System: Colors and Forms Posted: 16 Dec 2020 11:26 PM PST In this, the second in our series of Figma design system tutorials, we'll be working on this magazine news blog WordPress theme:  This WordPress theme will eventually be coded, and you'll be able to download it for free as well. As this design will eventually end up in the hands of a developer I wanted to create a Figma design system for it; something which will help both of us. It will help me design new pages in the future, making sure everything is consistent, and it will also help the developer by creating an efficient coding process. The design system contains all the colors, the typographic information, sizing and spacing, and more.  In this tutorial I'm going to show you how to develop a few aspects of the design system, giving you an idea of how to implement your own: colors and forms. Let's dig in! Creating a Figma Design SystemThis Figma design system tutorials is part of a series of videos–here they are, all in one place! The Power of Design SystemsTake a look at this collection of learning resources in this Tuts+ series Unlock the Power of Design Systems, including the beginner's course: And if you're interested in getting started with Figma design systems, try these on for size!
 See you in the next tutorial!  |
| 42+ Best YouTube Thumbnail Ideas (Using a Custom YouTube Thumbnail Generator) Posted: 16 Dec 2020 11:00 PM PST Since your YouTube thumbnail is the first thing potential viewers see when browsing YouTube, you want a thumbnail that will grab their attention and tell them what your video is all about.  Today we'll introduce you to the Placeit YouTube thumbnail creator and show you how to make a thumbnail for YouTube in five simple steps, so that you can create stunning, attention-grabbing YouTube thumbnails. Then we'll share 42+ of the best YouTube thumbnail ideas from Placeit. How to Make a YouTube Thumbnail Quickly and EasilyIf you've been wondering about the best way to make YouTube thumbnails, wonder no more. Follow these five simple steps and discover how to make your own thumbnails for YouTube videos with the YouTube Thumbnail Creator from Placeit. Step 1: Select a YouTube Thumbnail Design Browse the YouTube thumbnail templates and when you find one you like, click on it to open the YouTube thumbnail generator. The great thing about the Placeit templates is that you never have to ask yourself "What are the dimensions of a YouTube thumbnail?" because the generator offers the exact YouTube thumbnail dimensions you need.  Step 2: Choose a Background Image & Colour SchemeNow let's customise your YouTube thumbnail template.  Go to the controls on the right of the template and choose a Background Image that best reflects your subject. If you have a specific image in mind, you can type a term in the search bar to find the perfect image for your needs.  Now choose a Graphic for your template. Alternatively you can choose no image at all, but if you choose to use a graphic, select a colour for it.  Next, choose a colour for the Top Banner Colour and the Badge Colour.  Step 3: Add Text & Change Your YouTube Thumbnail FontNow move to the left side of the template and enter any text you want to appear on your template. When you are done, change the font and font colour as needed. You can remove text by turning off the eye to the left of your text. You can also add additional text and upload your own logo.  Step 4: Resize and Move Your Text as NeededYou can move and resize your text and/or logo as needed, and if you don't like what you've done, just hit the Reset Layout button to return to the default layout.  Step 5: Download Your YouTube Thumbnail DesignWhen you are happy with your design, just click the Download button.  This will take you to the download page, where you have two options for purchasing your YouTube thumbnail design.  You can either pay a single fee for your design or sign up for a monthly or yearly subscription that offers you unlimited downloads of all Placeit's designs, mockups, logos, videos, and gaming templates.  Now that you know how to make thumbnails for YouTube videos using the best YouTube thumbnail maker on the internet today, let's take a look at a few of the awesome YouTube thumbnail designs you can find at Placeit. Best YouTube Thumbnail TemplatesYouTube Thumbnail Template for a Healthy Desserts Vlog Personally, I'm not a believer in healthy desserts, but hey, if that's your thing, then this is the template for you. And the good news is that even if you like your desserts unhealthy, you can easily use this template to make a YouTube thumbnail for your latest sugary creation. YouTube Thumbnail Design Maker for a Vlog If you run a channel giving out career advice, try this YouTube thumbnail maker. Its professional look and feel will give your channel just the right vibe. Colorful Video Thumbnail Maker for Pride Month Celebrate Pride Month with this vibrant, positive, colourful thumbnail. Or hey, why not use it all year round? YouTube Thumbnail Generator for a Wellness Channel That looks like a good place to be, doesn't it? But even if you change the image and text to something completely different, this will still be an eye-catching thumbnail to draw viewers to your next video. YouTube Thumbnail Template for Gaming Streamer TipsHere's a great gaming thumbnail for YouTube. And that title would also be a great subject for a video—it's the question every up-and-coming gamer wants to know the answer to. YouTube Thumbnail Generator for Beauty Influencers If you're an influencer, you probably want to spend your time finding great products and making your videos as good as you can, not designing thumbnails. So keep things simple and get a YouTube thumbnail like this one that works right off the bat. YouTube Thumbnail Creator for a Soft Meditation Music Playlist Most of us use YouTube to distract ourselves, but why not use it to focus? This morning meditation template has the ideal soothing colours and calming imagery for a successful meditation playlist. YouTube Thumbnail Online Maker for a Comedy Sketch Compilation It's great to have a striking image and some large text on your YouTube thumbnail, and this template gives you both of those. The bold YouTube thumbnail font will help the title stand out even at a reduced size. YouTube Thumbnail Design Maker for a Travel Vlogger Don't have access to a yacht? Don't have this guy's muscle tone? Don't worry. This template would also work with a range of different images. It's a very flexible template, so change it up and make a YouTube thumbnail you can be proud of! YouTube Thumbnail Generator for a Stand Up Comedy Special This one is advertised as a thumbnail for a stand-up comedy special, but like many of the templates featured here, it could be adapted for many things other than its stated purpose. Change the image and text, and you've got a very different vibe. YouTube Maker for Tech Products Many of these templates put the emphasis on a large image for the YouTube thumbnail background, but this one goes for an abstract pattern instead, with a smaller image inside a box. This is a great option if you want to put more emphasis on your text. YouTube Thumbnail Creator for a Foodie Vlog Food thumbnails are all about showcasing the mouth-watering offerings with some great imagery, and this template gives you the perfect chance to do that. The circle of text also lets you make a bold claim to grab people's attention. Colorful YouTube Thumbnail Design Maker for a Female Empowerment Channel If you profile successful women on your channel, this template is ideal. Just picture your channel with a whole set of thumbnails featuring different women, all unified by the same basic theme. It would be a great look. Simple YouTube Thumbnail Maker for a Beauty and Fashion Vlog A stop sign is a great choice for a YouTube thumbnail background. It's an instantly recognisable international symbol, and it tells people they're about to make a mistake, which is a guaranteed way to get clicks. This could work for anything from nail mistakes to career mistakes and much more. YouTube Thumbnail Template for Fitness Vlogs The New Year is coming up, and that means one thing: everyone will be going on YouTube and watching videos about the exercise they should be doing. Take advantage of the trend with this stylish YouTube thumbnail idea. Colorful YouTube Thumbnail Design Template for Beauty Vlogs The colour scheme of this thumbnail works really well, with the two boxes and the woman's hair all in different shades of purple. If your image is a different colour, see if you can change the colour of the boxes to create a similar effect. YouTube Thumbnail Ideas for Cooking Channel The great thing about the YouTube thumbnail ideas featured here is the variety. This one offers three different text boxes, so you can communicate a lot of information, while still leaving space for an eye-catching image. LGBTQ Pride Youtube Banner Thumbnail Maker The best font for a YouTube thumbnail is usually something bold and clean, so that it shows up clearly even at a reduced size in the sidebar. This one clearly communicates its message of LGBTQ Pride, with some great imagery and a rainbow pattern to reinforce it. YouTube Thumbnail Design Maker for a DIY Vlogger "How to" videos tend to do really well on YouTube, so why not produce one of your own? Just get a YouTube thumbnail like this one, change the image and text, and off you go! Simple YouTube Thumbnail Design Template for Healthy Lifestyle Vlogs Healthy lifestyle habits are growing in popularity, with more awareness all the time of the importance of how we live, both to our own health and to the planet. If you've produced a video on that topic, here's the perfect thumbnail to go with it. YouTube Thumbnail Maker for a Power Yoga Vlog How big is a YouTube thumbnail? The great thing about the Placeit app is that you don't have to worry about resizing anything. You can focus on the creative part, and the app will produce an image at the correct YouTube thumbnail size. Fitness YouTube Thumbnail Template for a Bodybuilding Channel Fitness vloggers will love this template, with its dark colours, striking image, and eye-catching red text. The high colour contrast really makes it work, so keep that in mind if you decide to change things around. Gaming Thumbnail for YouTube for a Rainbow Six Siege Commentary If you're a Rainbow Six Siege fan, you'll love this thumbnail template. But it's also flexible, so you can use it to create any kind of gaming thumbnail for YouTube. YouTube Thumbnail Maker for a Family with Kids YouTube Channel Every moment of family life looks like this, right? Happy, laughing kids in a sunny, bokeh-strewn scene. Well, even if it doesn't, don't worry—that's the side that looks good on YouTube. Promote the positive and watch the views roll in. YouTube Thumbnail Template Featuring a Fashionable Minimalist Design You don't have to wait for Fashion Week to use this elegant, minimalist template. Just change the text, choose an image, and use it all year round. YouTube Thumbnail Maker for a Cycling Vlog Use this flexible template to make a YouTube thumbnail for your next video, whether it's on cycling or a different topic altogether. When you switch out the imagery and text, it can become whatever you want. You could use this as your go-to template for videos on a whole range of different subjects. YouTube Thumbnail Maker for Fashion Vloggers It's important to have some contrast in your thumbnail, so that the text stands out even when it's very small. This thumbnail achieves that with its black text in white boxes over a dark-coloured YouTube thumbnail background. YouTube Thumbnail Maker for a Travelling Vlog Channel It's hard to see whether this is the most beautiful waterfall because there's a big green blob on top of it. But the idea of a YouTube thumbnail is to entice people to click, not to give away too much all at once, so this could work in your favour. Make people watch the video to see what it really looks like! YouTube Thumbnail Maker for a YouTube Channel Review Different types of YouTube videos have different styles of thumbnails. This style is perfect for technology and photography reviews, with its bold text, simple black and red colours, and clean imagery. YouTube Thumbnail Design Maker with Education Subjects YouTube thumbnails are often very contemporary in their design, so why not stand out by going for a vintage look? Get a YouTube thumbnail that will set you up for success! YouTube Thumbnail Maker for a Beauty Vlogger If this is a natural look, I'd hate to see an airbrushed look. But still, remember that you can and should change the text and image to make a YouTube thumbnail that's truly your own. This is just the starting point! YouTube Thumbnail Generator for a Regional Architecture Class This template has a highly specific title, but don't feel restricted by that. The example given is of Islamic architecture, but with different text and imagery, this thumbnail could work for all kinds of videos. Customising is easy with Placeit's online YouTube thumbnail maker. YouTube Thumbnail Maker for a Philosophy Channel Philosophy isn't exactly what comes to mind when you think of YouTube, but there's room for everything on there. If a YouTube video is published and nobody is there to watch it, does it really exist? With this thumbnail, you won't have to worry about that. YouTube Thumbnail Creator for a Class About Photography for Kids Something tells me that today's kids are more likely to be using a mobile phone camera than a vintage Minolta, but there are always exceptions to any rule. Either way, this is a great template if you're creating videos to inspire the Cindy Shermans of the future. Colorful YouTube Thumbnail Design Template With Workout Images Want to make a YouTube thumbnail that will stand out in a crowded feed? This is a great option, with its colourful design and high contrast. If you change the image, be sure to choose one that's similarly eye-catching and maintains the strong colour contrast. YouTube Thumbnail Template for a Joke Compilation Vlog We all need a good laugh sometimes, don't we? Attract people to your latest comedy creation with this eye-catching thumbnail. The corner tab is a nice touch for highlighting a particular selling point. YouTube Thumbnail Maker for a Video About Gardening for Kids Thanks to the frequent lockdowns in many countries around the world, 2020 was a great year for kids to learn about doing things at home. Help them keep up the habit with this cute thumbnail for videos about gardening. YouTube Thumbnail Template with a Home-Education Theme One positive effect of the Covid-19 pandemic was that many people discovered the benefits of home schooling. If you want to tap into that newfound interest, here's a thumbnail that could work really well. Beauty YouTube Thumbnail Maker Lists ranking the "best of" are always popular on YouTube, and you can use this thumbnail to create your own rundown of the best items in your area. YouTube Thumbnail Maker for a Tech Reviews Channel The best font for a YouTube thumbnail depends on your subject. For tech channels, this futuristic but still highly legible font is ideal. The red strip at the bottom is a great place to highlight your key selling point. Thumbnail Design Maker for a Career YouTube Channel For a careers channel highlighting successful entrepreneurs, this would be the ideal thumbnail. With a portrait photo in the box and the text on the right, it communicates everything viewers need to know. And it's all set against a professional-looking YouTube thumbnail background. Minimalistic YouTube Thumbnail Maker for Vlogs Minimalism is king, and this elegant YouTube thumnail idea takes full advantage. The style of the thumbnail matches the subject and helps promote the minimalist lifestyle. Fitness YouTube Thumbnail Maker for a Workout Channel Now that's a thumbnail that people will click on! The strong image combined with the bold promise of toning your body in six weeks will create the perfect recipe for YouTube success. Create Your Custom YouTube Thumbnail TodayNow that you know how to create a thumbnail for YouTube and where to find the best YouTube thumbnails on the market today, head on over to Placeit.net and create your own stunning custom thumbnail today. And if you're interested in other terrific resources available from Placeit, check out this list of articles below:
 |


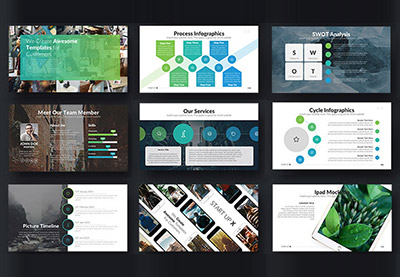


| You are subscribed to email updates from Envato Tuts+ Tutorials. To stop receiving these emails, you may unsubscribe now. | Email delivery powered by Google |
| Google, 1600 Amphitheatre Parkway, Mountain View, CA 94043, United States | |


0 Comments: